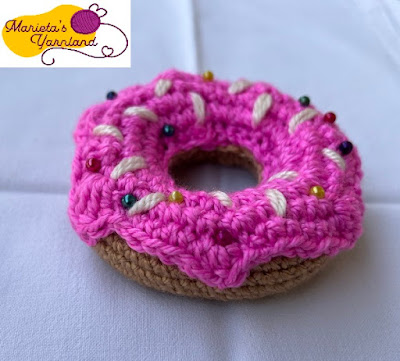
Donuts Glazed by Marieta Iosifidou

A cozy, easy pattern which give joy.
Kids, All Over
the World, love Glaze Donuts… at Any Time, Day and Night.
So, a super Idea , to make
donuts, healthy and so delicious.
Recipe absolute easy:
45grms of DK weight yarn (in two colors),
hook 3,5mm(US E) ,
2 happy, creative and crocheting hours
......aaaaand
Glazed Donuts are absolute ready.
Pattern include written instructions in two sizes (medium ,small for fitness lovers)
This pattern can be used to make donuts pincushions for personal use. Also is a great
idea for Handmade Gifts for our beloved persons.

Let’s start it:
Materials
-
Hook: 3,5mm (US E)
-
Polyester filling
-
1 crochet stitch marker
-
Straight pins with colored heads or colorful yarn
-
A pair of scissors and yarn sewing needle
Abbreviations: (US terms)
- · Sc: single crochet
-
R: round
-
Dec: decrease with sc - sc2tog = single crochet 2
together
-
Inc: increase with sc – 2sc in the same stitch
-
S/sts: stitch/stitches
-
sc2tog = single crochet two sc
together - It is a way to decrease (make the item smaller) Insert hook into stitch
and draw up a loop. Insert hook into next stitch and draw up a loop. Yarn
over, draw through all 3 loops on hook.
-
Ch: chain
-
ss: slip stitch
-
Dc: double crochet
-
Tr: treble crochet
-
CC1 : firtst colour of yarn
-
CC2: second colour of yarn

Starting
Fitness DONUTS in Small size:
With the basic yarn CC1, make Chain 20
Join the last chain with ss with
the first chain of previous row. Take care, no to twist the chain. With this
way, form ring to work the donut. Put marker
· R1: 1sc in each chain around (continue
without join,sm, mark beginning of
every row) – 20sts
· R2: *1sc, inc* - Repeat to end of
row 30sts
· R3: *1sc, 1sc, inc)*, Repeat to
end of row – 45sts
· R4 to R10: sc in each chain around – 45sts in every round
· R11: *1sc, dec* Repeat around -
30sts
· R12: 1sc in each chain around –
30sts
· R13: *1sc, dec * Repeat around -20sts
· R14: 1sc in each chain around –
20sts
· Finish off, leaving long tail for sewing
· Fold so first and last rows meet, forming a
donut, joins them.
· Whip stitch first & last rows together
(center of donut) stuffing as you go
· Glaze:
with the second color of your choice,
· With the CC2, make Chain 20
Join the last chain with ss with
the first chain of previous row. Take care, no to twist the chain. With this
way, form ring to work the donut. Put marker
· Repeat rows 1-4 of donut (previous part of
pattern)
· R5 In this round, form the glaze: *2sc, 1hdc, 1dc, 1tr, 1dc, 1hdc, 2sc*, rep from * to complete the
round (5 times).
· Finish off, leaving long tail for sewing. Sew Glaze to top of donut. You can
decorate your donuts with beads or with yarn in different color to make sts all
over the glaze.
NO fitness DONUTS - big size
DONUTS in bigger size for NO fitness donuts :
With the basic yarn CC1, make, 30 chains.
Join the last chain with ss with the first chain
of previous row. Take care, no to twist the chain. With this way, form ring to
work the donut. Put marker
· R1: 1sc in each chain around (continue
without join, sm, mark beginning of
every row) – 30sts
· R2: *1sc, inc* - Repeat to end of
row 45sts
· R3: 1sc in each chain around– 45sts
· R4: *1sc, 1sc, inc)*, Repeat to
end of row – 60sts
· R5 to R11: sc in each chain around – 60sts in every round
· R12: *1sc, dec* Repeat around - 45sts
· R13: 1sc in each chain around – 45sts
· R14: *1sc, dec * Repeat around -30sts
· R15: 1sc in each chain around – 30sts
· Finish off, leaving long tail for sewing
· Fold so first and last rows meet, forming a
donut, joins them.
Whip stitch first & last rows together
(center of donut) stuffing as you go
· Glaze:with the second color CC2 make 30chs
Join the last chain with ss with the first chain
of previous row.
Take care, no to twist the chain. With this way, form ring to
work the donut. Put marker
· Repeat rows 1-4 of donut (previous part of
pattern)
· R5: 3sc,1hdc,1dc,1tr,1hdc,3sc)x6 to
form drips, rep from * to complete the
round (6 times)
Finish off, leaving long tail for sewing.
Sew Glaze to top of donut.
You can
decorate your donuts with beads or with yarn in different color to make sts all
over the glaze .
Please,
if you will use this pattern, add the pattern's name #donutsglaze & #marietasyarnland
in your instagram post or
in your photos in social media
Happy creative hours.
The designer Marieta Iosifidou
© All
Copyrights are Reserved by Marieta Iosifidou
Total or
partial use of the post and photos is Prohibited
Without the
notification and written consent of the creator-author.
Failure to
comply with the above has Legal Consequences.


